Showing posts with label OPI. Show all posts

Thursday, April 28, 2016

Doughnut Nail Art


Hey everybody! Guess who got a new camera. ME! Guess who doesn't know how to work all the fancy new settings. ME! Seriously though, it's a struggle. I had a DSLR before, but my new one is a lot more fancy than the one I had. It's still the same, but completely different. I've also realized that adjusting photos in Lightroom is A LOT easier than adjusting the color in Photoshop. That's another thing I'm trying to get used to. Hang in there while I get all my settings to the way I like them.

ANYWAY... Nail art! I did some doughnuts! Donuts? Doughnuts? They're both the same to me. Apparently "doughnuts" is the proper term, but "donuts" is also correct. They both date back pretty far, so if you're crunched for time, you can be like me and always use "donut".

Products used:
  • Beauty Secrets Base Coat
  • OPI - Don't Pretzel My Buttons
  • Essie - Pinkadelic
  • Apple Barrel Acrylic Paint
  • Butter London P.D. Quick Top Coat
  • Dotting tool
  • Liner brush


I bet I made you hungry for some donuts, yeah? ;)

If you want to see me create this design on my nails, and want to give it a try yourself, then check out my video tutorial below!


Monday, January 25, 2016

Floral Mix & Match Nail Art


Hey everybody! I hope you're having a great week so far! Today's nail art is a little mix and match-y with some floral print, polka dots, and stripes. I don't have too much to say for this design. I just went with what I was feeling and this is what I came up with. Everything is freehanded except for the stripes. I used striping tape for those nails because it's a million times easier. I can't draw a straight line to save my life.


Products Used:
  • Beauty Secrets - base coat
  • Wet 'n' Wild Megalast - Whipped Topping
  • OPI - Privacy Please
  • Wet 'n' Wild Wild Shine - Black Creme
  • China Glaze - Seas The Day
  • China Glaze - Don't Get Derailed
  • China Glaze - Secret Peri-wink-le
  • China Glaze - City Siren
  • China Glaze - Dance Baby
  • Plaid Apple Barrel - acrylic paint
  • Striping tape
  • Butter London - Hardwear P.D. Quick top coat


Want to learn how to create this design? Watch my video tutorial!


Wednesday, November 4, 2015

Delicate Glitter Gradient with Bones Nail Art with Tutorial


Hey guys! I'm going to make this post really quick because it's kind of Halloween related and most people are over it already because it's now November, but I wanted to share them with you anyway! This was the nail art I had on my nails for Halloween. I wanted to get this out before Halloween, but since I did it the night before, it was too much of a rush for me to finish the video.


I used Cult Boneyards as the base color and then painted on tiny little bones with a dotting tool and a nail art brush with acrylic paint. The glitter is OPI Pirouette My Whistle. The top coat is Lauren B. Beauty's Gel-Like top coat.


If you want to see how I created this design or learn how to create it on your own nails then check out the video below.


Sunday, October 25, 2015

Bruised Nails Nail Art with Video Tutorial


Happy Sunday everyone! I hope you've all had a great weekend. Today I am sharing this bruised nail art design with you. Lately I've been learning about SFX and watching loads of videos about it on YouTube. I took the idea of the bruising technique that is very popular in SFX and made it into nail art. I think this looks pretty cool!


The base color I used for this design is Samoan Sand by OPI. It's seriously the perfect nude for my skin. I'm going to be so sad when I run out because it's now discontinued. I also used Butter London's Matte Finish top coat. All of the bruising colors were mixed using Apple Barrel acrylic paint. I used dark green, purple, blue, red, bright green, yellow, and black. I applied it with a sponge that I ripped up so it had an awesome textured effect. You can see how I did that in my video tutorial below! Once I finished applying all of the colors I added another layer of the matte top coat because, obviously, bruises aren't shiny. 


If you want to see how I created this design then feel free to watch my video tutorial below!


Friday, October 23, 2015

Halloween Candy Nail Art with Video Tutorial


Hello everyone! I'm back again with more Halloween themed nail art! This time I'm throwing some candy at you. I'm slightly late on this one, because I've had the tutorial up for a while already. I didn't have time to share it anywhere except YouTube and Instagram. Better late than never though!


The base for this nail art is OPI Live and Let Die. It's a super, super dark green with some flecked shimmer in it. The candy was all done with various colors of acrylic paint and a small nail art brush. The top coat I used is from Lauren B. Beauty


I think these turned out pretty cute! The colors could easily be changed to fit something else other than Halloween as well. If you want to see how I created this design then don't forget to check out my video tutorial below!


Saturday, October 3, 2015

Zombie Bite Halloween SFX Nail Art with Video Tutorial


Hey everybody! It's been a while since I've shared some nail art with you. I bet you didn't except to see this kind of nail art either. I started my Halloween series on my YouTube channel! Every video I upload will be related to Halloween in some way. They will either be Halloween colored or design themed.

For my first video I did zombie bites! An SFX style nail art. I really love the way it turned out. It's not a practical, every day nail art design. It's definitely only meant for a night out to a party or to compliment a zombie costume because it has a ton of nail polish layers and it does take a while to dry. Someone in the comments section of my tutorial video mentioned that you could do this on a set of fake nails and let them dry ahead of time. That way you can just glue them on when you're ready to go. I thought that was brilliant! It's certainly something to keep in mind if you want to give these a try.

I started out using a base coat and a red polish. I used China Glaze's Hey Sailor. I built up the red polish and then placed a clear top coat over it. Then I added a nude polish. I used OPI's Samoan Sand. Once I built up my nude polish to be opaque I made it matte with Butter London's Matte Finish top coat. After that I used a dotting tool and started to rip holes into the polish since they polish underneath is still very wet. I let them dry and then added details with acrylic paint. I used a thinned out blue for the veins with a striping polish and then sponged on thinned out red using a makeup sponge. Then I filled up some of the holes with my red polish and made some of them look like they were dripping blood.


Gruesome yet fun! What do you guys think about this design? Would you wear it? If you want to see exactly how I did this design, then check out my video below.


Monday, June 17, 2013

Square Geometric Print Nail Art Inspired by Clothing From Deb Shops


Happy Monday everyone! I hope you all have a great start to a new week! If you happen to have a "bad case of the Mondays", don't worry! Maybe this fun nail art design and outfit will cheer you up!


This nail art design was inspired by this outfit from Deb Shops!


Tank: This mint colored, sheer, high-low equipment tank is super lightweight, super flowy, and super comfortable! It's accented with cute gold buttons, which I love! Since it is sheer, I highly recommend wearing a bandeau or a tank top underneath. I personally chose a bandeau, but if you're not comfortable with showing that much skin, then a tank top would work just as well! You can find this tank HERE.

Shorts: How cute are these shorts? Normally I'm not a huge fan of patterned shorts, but I couldn't resist these! I love the pattern and the colors so much! The mint, pink, and beige colors work so well together! These shorts are also very comfortable to wear. They're not stiff and they do have a bit of stretch to them. You can find these shorts HERE.

Sandals: Since I already had quite a bit of the same colors with the tank and the shorts, I decided to neutral on the shoes and went with some adorable natural colored sandal with a rhinestone bow. I love these as well and since they are neutral colored they can go with pretty much any outfit! You can find these sandals HERE.


I decided to base the nail art off of the shorts, because I loved the pattern so much that I thought it would translate well as nail art.

I used striping tape and a small nail art brush to do this design! The basically white lines is where the striping tape was and I used the tape as guidelines to trace the squares (or diamonds?) on the inside.

For the white base I used Wet n Wild's Wild Shine in French White Creme. If you don't like spending lots of money on white polishes because they dry up, get thick, and run out too quickly, I highly recommend getting this polish. It's only 99 cents and I think it works great for the price! The blue is China Glaze Too Yacht To Handle from their newest summer collection. The pink is China Glaze Dance Baby. Yeah, yeah, I know.. I've been using Dance Baby a lot lately, but I can't resist! It's definitely one of my favorite pinks and is usually my go to when I need a standard pink cream. The beige/brown is OPI Berlin There Done That. And of course I used Out The Door for my top coat. 

I personally think these colors look fantastic together! At first I thought my beige choice was going to be a little too dark, but it turned out to be just right!


This pattern can be a little bit tricky if you don't have a steady hand or a small detail brush (try using a toothpick), but you can always make the squares a little bigger than what I did and that will make them easier to fill in.


I do believe I'm going to end this post here! Don't forget to check out my video tutorial below if you want to give this design a try. I explain it step by step so it's easier to understand! Also, I provided a few photos of me wearing the outfit in the above picture. Isn't it cute? I personally love it! Anyway, I hope you all have a great Monday! :) 


Check out my video tutorial!

Polishes:


*Clothing provided by Deb Shops


Monday, March 4, 2013

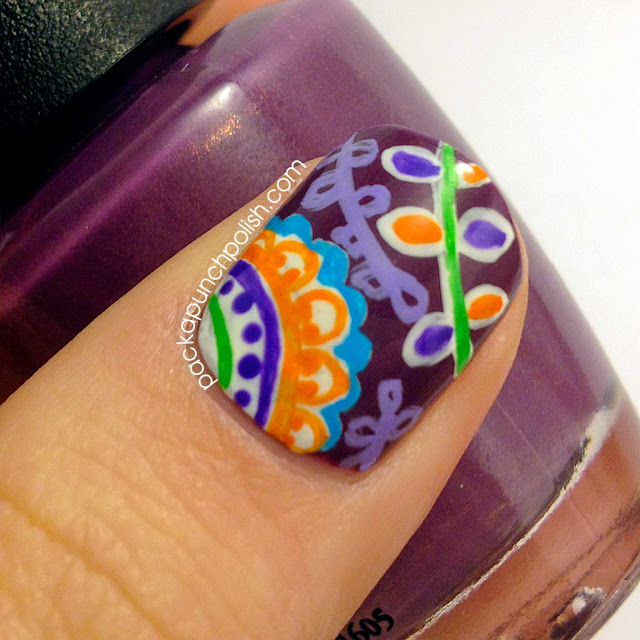
Vera Bradley Plum Crazy Inspired Floral Nail Art

Hi everyone! I hope you are all having a great Monday evening!

This design is something I pulled from my "forgotten vault." I did this a month or two ago, and never go around to actually making a blog post about it. I just recently shared it on my Instagram and a lot of people seemed to love it so here I am! Sharing it here!

It was inspired by THIS design from Vera Bradley. I don't personally own anything by Vera Bradley, but I absolutely love all of the patterns and designs that are available and I love to recreate the patterns and turn them into nail art.


I used OPI's Dutch Ya Just Love OPI as the base color for this design. It's a really pretty purple with some golden shimmer in it. All of the designs were done with acrylic paint, a tiny paint brush, and a dotting tool.


I really like the colors in this design and even though it's on a darker base, I think this is perfect for spring. I can't wait until warmer weather comes around. It's a bit too cold for me here in Pennsylvania right now.

What weather do you guys enjoy? Do you like the freezing cold snow? The mild spring weather? The blazing hot summers? 


Don't forget, if you have Instagram, you can follow me there to sometimes see previews of what I will be posting here! My Instagram name is @packapunchnails

Don't worry, if you don't have an account you can still view my photos here: http://instagram.com/packapunchnails


Polish used for the base:

Thursday, January 24, 2013

Candy Bow Ties and Dotted Half Moon Nail Art

Hello everyone, and welcome to the new readers! I gained a few since the giveaway has begun! If you missed the post and didn't know I'm having a giveaway, you can go check that out HERE.

This design completely reminds me of candy. If I worked in a candy shop I would do my nails like this for every work day. I would never be able to work in a candy shop though... There wouldn't be any candy left at the end of the day because I would eat it all.


I was looking online at fabric patterns and I found a huge photo of smaller squares and each square had a different design. That's where I got the idea for the bow tie pattern. The inspiration photo was in black in white, but I thought it would be really cute to make the pattern brightly colored.

I did two nails with the bow tie pattern and then I got bored, because it was taking forever, so I added some pink half moons with dots surrounding them in the same colors as the bow ties to save some time. I must admit, I'm glad I did. I think it's a really cute combination!


I started with a white base polish on all of my nails. I used Sally Hansen Xtreme Wear in White On.

Then I used a small nail art brush from my 15 piece brush set to make the bow tie shapes. I also used the same nail art brush to free hand the half moon shape on my other nails. Then using a dotting tool I just outlined the half moon with a few dots, just to make it more interesting and colorful.


The yellow is China Glaze Happy Go Lucky
The green is China Glaze Def Defying.
The orange is OPI A Roll In The Hague.
The blue is China Glaze Hanging In The Balance.
The pink is China Glaze Fuchsia Fanatic.
The top coat I used for this design is my usual, Out The Door. I had to use a really light touch though, and I still managed to get some smearing. Isn't that the most frustrating thing EVER?! It is for me.


Even though I said I could eat a whole candy store if I worked there, I'm actually not a big candy eater. I try to avoid it as much as I can. I would rather eat a cookie or a brownie.

Are you a candy lover or a cookie and cake lover like me?

Polishes Used:


Monday, January 7, 2013

Delicate Fairy Tale Nail Art

Hello my friends! I have a stamped design for this post. I don't do stamping designs very often, but I thought of this idea recently and HAD to do it and I'm so glad I did! I absolutely love the way it turned out and I love how delicate and dainty it is.


I started with three thin coats of OPI Don't Touch My Tutu. It's a very sheer white jelly and I'm in freakin' love with it! It's such a clean looking polish. 

After I let that dry I stamped the image onto my nails using Sally Hansen Xtreme Wear White On. The image that I used was from the Bundle Monster plate BM-314. You can see all the plates from that set HERE

I let that dry for a few minutes to avoid smearing, because I then applied OPI Pirouette My Whistle over the stamped image. Pirouette My Whistle is a really nice fine silver glitter with sheer white hex glitters. I've been wanting this polish for a while and finally ordered it online. It probably looked like I was doing some pirouettes as I was dancing around the house because I was so excited when it came. 

After that dried for a little I applied one more coat of Don't Touch My Tutu to create this super cute jelly sandwich look. I love how it sealed the glitter and the design all together. It turned out so nice! I'm so proud of myself for thinking of this!

Then I used Out The Door as my top coat. I think I've come to the conclusion that Out The Door is my all time favorite. It doesn't shrink my polish, it has minimal smearing with nail art, and it's not a gazillion dollars.


This design reminds me of a fairy tale, but it would also be great for weddings. If you think about it a wedding is kind of like a fairy tale, right? It's also a nice palette cleanser if you're tired of wearing super bright or super dark polishes. It's always nice to wear something neutral for a while.


I know stamping is pretty easy, but I did a tutorial for this design anyway since there are a few different layers. You can check it out below if you want!


Products Used:


Wednesday, December 26, 2012

Mix and Match Christmas Nail Art 2012


Hello gorgeous blog readers! This is a late post. Here in PA in the US it's no longer Christmas, but I wanted to share what I had on my nails for all of the festivities! Lot's of red, green, white, silver, and glitter took over my nails for my Christmas design. By the way, say hello to my right hand! You guys don't see it very often. I swear I have one. I'm not one handed.


I went with some mix and match designs because I have been loving them lately and you can never go wrong with mix and match Christmas designs! I used an array of polishes to do this so I will start on my thumbs and go to my pinkies.


On my thumbs I have one coat of OPI Wocka Wocka with two coats of OPI Gettin' Miss Piggy With It. These two polishes make such a gorgeous combo! At first I wasn't feelin' it, but then I went out into the light and saw how much it sparkled and was like.. WOAH! and then I fell in love.

On my index fingers I have three coats of LA Colors Color Craze in the color Live. It's a cheap 50 cent polish I picked up at a dollar store, but holy cheese balls I seriously need to go scout out more bottles of this polish. It's the best foil-y silver polish EVER! On top of the silver I hand painted a little white snowflake with a medium length striping brush and acrylic paint (I will be reviewing the set of brushes that it belongs to shortly!). Then, like it wasn't already shiny enough, I added a few loose holographic silver hex glitters (I will be reviewing them soon too!).

On my middle finger I started out with a base of Essie Tennis Corset. If I remember correctly I used three or four coats to get it to a nice opaqueness for a candy cane. It has a beautiful gold shimmer which made it an amazing base for the shimmery stripes. For the stripes I used China Glaze Running In Circles and OPI Meep-Meep-Meep. I love how they all had similar shimmer so they were nice and uniform, but still different.

My ring fingers have a glitter placement technique. My base polish I used underneath the glitter was China Glaze Adventure Red-Y. I took the same loose holographic silver hex glitter that I used on my index fingers and placed every single piece of one by one with a dotting tool and some top coat. Time consuming... I know, but it's totally worth it in the end. My mother made fun of me because at one point during the day all I did was sit and stare at my nails because I had nothing better to do after stuffing my face with ham and mashed potatoes and a mass amount of cookies. YUM!

My pinkies have one coat of China Glaze Running In Circles and two coats of OPI Fresh Frog Of Bel Air. Another gorgeous combination as well!


I topped everything off with a good coat of Out The Door top coat. Either one coat, or two. My ring fingers definitely had two coats of top coat to smooth out the glitters.


My right hand isn't too bad right? Ha. Ha! I just realized what I said. Right, right? Did you get it? Maybe? Yeah I know, I have lame jokes. No biggie. 

Don't forget to follow me on IG to sometimes get sneak peeks of what's to come on the blog! http://instagram.com/packapunchnails


Available Polishes In This Post On Amazon:


I hope everyone had, or is still having, a fantastic holiday season! I know I sure did! Happy Holidays!!

Friday, October 26, 2012

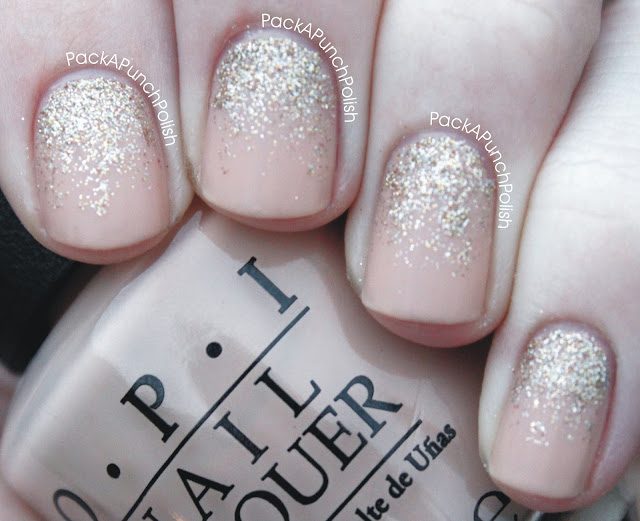
Nude Nails with a Glitter Gradient


Here's a little something I threw together really quick! Nude nails with a sandy gold glitter gradient. LOVE these!


The base color for these nails is (once again) OPI Samoan Sand. I can't stop using it. I think I need an intervention. No! You can't take it from me! It's all mine!

For the glitter gradient I used I'm Not Lion by China Glaze. This is another polish that I can't stop using. It's just too pretty. I just applied the gradient using the actual nail polish brush. Nothing fancy. I was too lazy to do anything super exciting today. It's also been super cloudy and dreary outside here in Pennsylvania, so I don't even have good lighting to take photos.

To make them matte I used Butter London's Matte Finish Topcoat. 


That's about it for these nails! Obviously nothing too special, but I always enjoy sharing the simple nail art along with the extravagant. :)


Thursday, October 25, 2012

Matte Nude, Black, and Gold Glitter Leopard Print


Here's a quick design I threw together today! Just some simple leopard print. Sometimes simple is better than crazy and extravagant.


The base color for these nails is OPI Samoan Sand. I know I've said this before... but I am seriously obsessed with this polish. It is the PERFECT nude polish for my skin tone. I should probably stock up on it before it mysteriously can no longer be found, because I don't think I'll ever find another this perfect for me. If you're on the pale side like me and you have a hard time finding a nude definitely give this one a try! I have it as one of my favorites in the Amazon widget to the along along with some of my other faves. I seriously buy everything from Amazon.

The glitter in the center of the leopard print is I'm Not Lion by China Glaze. It was part of the On Safari collection (which I just ordered from Amazon! Can't wait for it to come!) It's a sandy gold glitter with silver and holographic glitter in it as well.

The black part of the leopard print was done with black acrylic paint by Apple Barrel and I used a tiny little paint brush. 

I also used Butter London's Matte Finish Topcoat to finish this simple, but gorgeous babies off.


I really love these. So simple, but so cute! What am I saying... Any nail art that's matte and nude is cute!


LinkWithin

Related Posts Plugin for WordPress, Blogger...